Wedding dress ideas

We visited our venue (and totally geeked-out at the museum!) on Saturday and met with the wedding coordinator there so we now have a date – the rather auspicious 19 September 2009. Or to put it another way, 19.09.09 (09/19/09 for the Americans)!

Good thing we have over a year though, because we’re going to need every single day of that to save up and prepare for it. Oh my, the grand total was an eye opener, and we’re not being frivolous in the slightest with our plans!

Luckily, then, my grandmother has given me her gown from her wedding in 1949. She’s insisted I use it and NOT be afraid to cut it up, saying she’ll cut it herself if I don’t, or donate it to goodwill or sell it on eBay. I think it’s her way of not letting me get too scared about changing it or treating it like a relic or something. In any case, I’ve seen photos of it, but I’m going to make you all wait until it’s shipped over to me, cleaned, and pressed before I document its “before” state properly.

Until then, here’s my rough sketch based on the photos and my mom’s eyewitness account:

Swirled lines sheath dress – 2nd muslin

Thanks very much for all your feedback on my post regarding the design lines for my upcoming sheath dress – I decided to go with the top design, and save the bottom one for some later colour blocking (maybe in ponte jersey?).

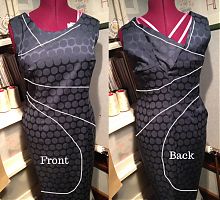
Once that was decided, I sewed up that basic Burda sheath dress (which fit me very well, as expected), then while it was on my dressform I drew rough design lines on to match. After the rough lines were on, I cleaned these up with French curves while the dress was lying flat (these photoshopped ones are just free-handed on top since my black lines on navy blue fabric were hard to see in the photo!)

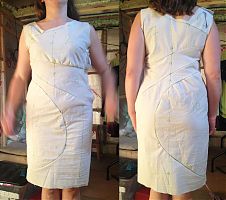
I then cut apart the Burda muslin along my new lines, and cut into the curves a few times to release any bumps. I then transferred these altered pieces onto a second muslin to test that all my new curves matched up well:

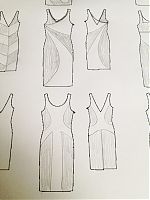
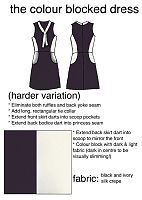
Design lines and ideas

I know it’s a cliché to say so, but I’ve been very busy lately! So busy that there was no sewing activity whatsoever last weekend (though I did cut and fit an awful lot of insulation for the new boat bedroom, attended two out-of-town barbecues, and raced a new 10km PB in the weekend available to me!). In two weekends’ time I’ve got a friend’s wedding and ever since we were invited, I knew I wanted to apply a Pattern Magic technique onto a sheath dress for this occasion.

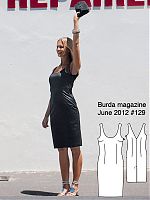
Overall, I was disappointed by the June Burda magazine, but I saw dress #129 and knew it’d be a great starting point since I know Burda’s dresses fit me very reliably (and I’ve already raised the waist by 1 inch to make it perfect).

The technique I’m looking to apply here is one I learned on my Pattern Magic 2 course at Morley College, though it’s well documented in the second book, too. Essentially, you make a muslin of a basic block (in my case, I’m using this Burda pattern), draw design lines wherever you like, cut along those lines, and then release any lumps into the curved edges of the new pieces.

So thus far I’ve copied the tech drawing off Burda’s site, raised the neckline a bit, and removed all the darts in Photoshop (since mine will be incorporated into my new design lines anyway), then printed off a bunch of these empty tech drawings onto a sheet of paper.

The turquoise and silver motif dress

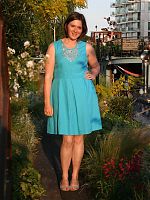
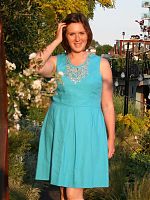
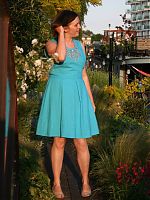
I am very pleased to finally be able to show you this dress, which has been quite a while in the making!

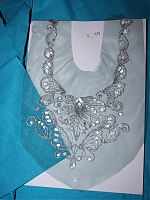
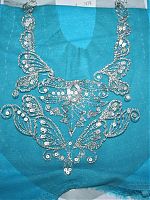
I first bought the motif at Mode et Travaux in Paris when we visiting there last summer, but then a few months ago I decided that I really wanted to do something with it, so I started laying out my first pattern ideas. Then I finally decided on a a pattern and started basting the motif onto my linen in preparation for our French road trip, where I painstakingly sewed the motif onto the dress using silver thread and an embroidery hoop.

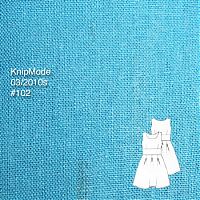
The finished dress is a variation on dress #102 from the March 2010 KnipMode supplement, but I modified the neckline heavily so that it’d match the motif’s curves. In actuality, I cut the curve of the neckline after I’d completely sewed the motif into place!

Since I changed the front neckline, I also had the widen the back at the neck edge to match the front, too. It means my big head can only just fit through, as it’s much narrower than the original pattern.

A linen & silver dress – ideas

London has gone super sunny and warm over the past few weeks, so my thoughts have turned to spring sewing and using up some treasures from my stash. Remember the silver chain and sequin motif I bought in Paris last summer? Well I still adore it, and I thought it’d be a great showpiece for a spring dress.

Since the motif is mounted on blue netting, I thought it’d be best to pick a similar coloured fabric for the dress, so that the little spots inside the design which can’t be trimmed away wouldn’t look too out of place. Luckily I’ve had this turquoise linen/rayon mix in my stash for a few years, so its day has come!

I thought it looked good next to the motif, but wow! it looks amazing when I actually pull some through underneath it!

Has anyone worked with motifs like this before? I’m guessing I just get silver lurex thread to match and take tiny stitches the whole way around and trim off the excess netting? Is an embroidery hoop useful (or necessary)? I’m hoping to get the piece cut out and ready to work on during our French road trip over Easter, with any luck.

The next step is figuring out which pattern I’m going to use. I used my usual method for sifting through my pattern magazines (like I did for my wedding gown and my latest winter coat) – since I’ve got all my At-a-glance pages scanned in an online gallery, I flip through them all looking for a suitable pattern, and when I find one, take a quick screenshot of that pattern (Shift-Apple-4 on Mac makes it really easy!), and rename the file to be the issue number so I can find where it came from.

Vintage wedding gown detail photos

My grandmother’s wedding dress arrived safely on Friday! I person, it’s absolutely jaw, droppingly gorgeous, even 59 years later. The preview photos I drew the technical drawing from didn’t do it justice, so I’m hoping these photos on James’s DSLR will help to show some of the amazing vintage details.

The dress is entirely silk satin with no lace, embroidery, or beading (just from a mesh panel around the neckline), and the weave of the silk is still perfectly and soft and so very strong still. Granny told me she bought this in a shop on South Street in Philadelphia in 1949, but I’m afraid I can’t tell you the designer as there’s no label and she’s long since forgotten the details. But the workmanship speaks for itself, and it’s very interesting for me to see that they’ve not wasted any silk where it couldn’t be seen – the mesh fabric is used for all facings, the seam allowances are only 1/2 inch, and there’s no lining.

Laid out on our table:

A Week in a Day

I’ve been a bad blogger this week. I’ve been doing lots (as you’ll soon see), but working every weekend for the past three, plus the weeks in between, and some out-of-town trips have all really sapped my enthusiasm to write! So I’m taking the lazy option out and catching you all up with a little roundup – a week’s worth of posts in a day…

Like the Wind workshop

Cult running magazine Like the Wind approached me a few months ago to ask if I’d like to run a “sew your own leggings workshop” at the week-long popup they were throwing together at the end of October. I’d known one half of the husband-and-wife team that run the magazine, but I’d never met Julie before this. Once I found out that she not only owns her own overlocker, but bought it when she sewed her own wedding dress with it(!), I knew we’d get along just fine.
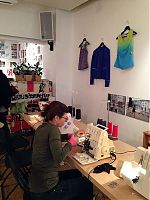
We had five runners who’d only done a small amount of sewing before, but had never touched an overlocker before, and certainly not a coverstitch either! They each picked their own fabric from FunkFabrics’ range, and walked home in some very stylish leggings at the end of the afternoon!

Georgina picked a “Gotham” print, so of course she just had to pose with the Batman art in the gallery!
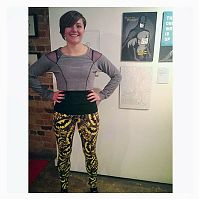
And here’s the finished set! I saw quite a few little “omg I’m so happy in my leggings” dances at the end, which really reminds me why I love teaching so much. Lucy posted a great writeup of the street art tour and my class, too.
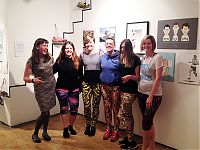
There may be another Like the Wind workshop in the new year if we can work out the logistics, but there will definitely be more up at the Thriftystitcher studio in January and February, to be announced very soon! The classes are very similar, so if you’re a runner you can come learn at Thriftystitcher, or non-runners vice-versa at Like the Wind.

But I was so jealous of all their finished leggings that I treated myself to some Funkifabrics lycra this week (it was difficult, but I settled on this geometric aqua number in the end, because it reminded me of a Lamb album cover!).

Random sweatshirt sewing

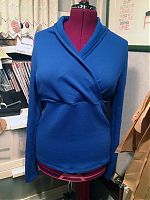
When I was pulling out supplies to bring along to the workshop, I came across pieces for this sweatshirt that I’d cut out in February when I was trying to deplete random bits of leftover sweatshirting that was taking up too much room in my little sewing cave. The lavender “sacrificial sweatshirt” came out of that same cull, but for some reason I never quite got around to sewing this blue one together at the time.
A classic pair of jeans

I know I’ve been recently focusing on sewing for my upcoming Mexico trip but I’ve been wanting to sew these since my FW12 and SS13 plans so it was high time I actually just sat down and made them!

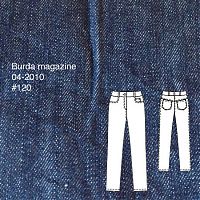
After umming and ahhing for months over which pattern I should use, then muslining two different patterns which were both too small, I ended up making this pair in two days’ flat! As you’ll recall, it’s #120 from the April 2010 issue of Burda magazine (sadly not on Burdastyle.com!), an issue which also had a great pair of men’s trousers I’ve been eyeing up for James, too.


Worn here with my plum bamboo Jalie top

I’m a bit scared that I can sew an entire pair of jeans now (including the front fly) without looking at instructions a single time… I did, however, inspect a pair of James’s RTW jeans once or twice to see which side of the seam they topstitched!


This one has been lightened so you can see the details a little better!

Oh, and remember when I tried on the muslin for this pattern and it was way too small in the waist and hips? Well, I put the muslin to the side in my sewing cave and tried them on a few weeks later and they fit perfectly now! Yes, only I would go and change my body instead of just doing a pattern alteration…

Manequim May 2012

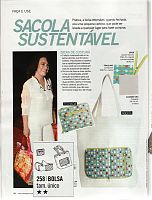
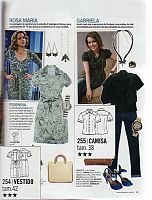
Hooray! It’s a new issue of our favourite soap opera-obsessed, Brazilian sewing pattern magazine, Manequim!

Oh look – it’s a shopper tote bag that folds up into it’s own zippered pouch! This is something I’ve seen a bunch in shops, but not in pattern form before.

I really like the square neckline and offset zipper opening to this shirtdress. On first glance, it looks quite standard, but the more I stare at the tech drawing, the more cool details I see in this!

My BurdaStyle Book contributor experience

This is a mirrored post to my spotlight on the BurdaStyle blog. I wrote about my experience back in September before the book came out!

When I heard there was a BurdaStyle book planned, I just knew I wanted to be a part of it! I had been a beta tester for BurdaStyle before the site ever even launched, and I’ve always felt that it was such a great resource for encouraging more people to sew and be creative and share ideas.

So last year I expressed my interest to be a contributor, and I was invited to submit some ideas for pattern alterations on two patterns for the book. I sat down with the details for the dress and coat patterns and just brainstormed for a week, drawing up loads and loads of ways I could take those basic patterns and morph them into something totally new. Some ideas were simple like, What if I lost the coat sleeves, shortened it at the waist and made it in fur? Or, What if I added sleeves to the dress, lengthened the centre front and made it a wrap dress? Eventually I paired down my sketches to about eight and submitted them for consideration.

I wasn’t really expecting any of my submissions to be picked for the book (my drawing skills have gone way downhill since high school art classes!), so I was ecstatic to learn that not only was I picked to be a contributor, but my dress variation was picked to be one of only two dress pattern variations in the entire book! Then it dawned on me that the tight deadlines would coincide with the few months I needed to sew my wedding gown! So I did some hardcore time management and set aside the better part of a month last summer to document my pattern alteration, write the new sewing instructions and sew up the sample for the book, PLUS get it sent off and done before the deadline!